Written By Ian Hoppe
![]()
![]()
![]()
![]()
![]()
![]()
SCSI is one of the most misunderstood concepts in computers. I am writing this article to try and clarify some of these questions. I will give you a brief overview of exactly what SCSI is and how it is used. I will give you instructions on how to set up SCSI in your own system. I will also list some of the better SCSI products on the market today.
First, SCSI (pronounced "scuzzy") stands for Small Computer Systems Interface, which is a standard for connecting your computer to various peripherals (Hard Drives, Scanners, CD-ROM's, Tape Drives etc...). This doesn't mean that you have to have SCSI to use these devices, but if it is implemented, it will usually be much faster and reliable. In fact, if you are reading this, chances are you don't have SCSI in your system. There are many different categories of SCSI. First there is SCSI, sometimes referred to as SCSI-1, this is the older of the SCSI systems. Next there is Fast SCSI, Fast Wide SCSI, Ultra SCSI and Wide Ultra SCSI. Finally there is Ultra2 SCSI and Wide Ultra2 SCSI.
Right now you are probably wondering just exactly what a SCSI system is, well I'll tell you. It includes a SCSI card, which is the main part of the system. This card plugs into one of the slots in your computer(I'll explain that later). Just because the card is inside of your computer doesn't mean that it can only handle internal peripherals. Most SCSI cards come with an external connector also, used to hook up peripherals such as scanners or external disk drives. The next part of a SCSI system is the peripherals, like I said earlier this can include many things. Most SCSI cards can handle up to 8 peripherals, some can handle more. This is one of the other advantages of SCSI, in case you didn't know, most motherboards can only support up to 4 IDE components. Usually this includes your CD-ROM and hard drives, if you want to add any more, you will have to buy a SCSI card. There is always the option of getting an external device and hooking it up by parallel port, but this method is extremely slow, thus another advantage of SCSI, since external SCSI is extremely fast as well. Here comes the more complicated part of SCSI, how the peripherals are set up. There are things called terminators, which in layman's terms tell where the beginning and end of the SCSI chain is. You must always have two terminators, one on each end of the chain, they don't have to be on the very end, but they must surround all of the devices. It is not essential that you know exactly how a terminator works so I won't go into it.
The following is a list of different SCSI connectors:
- Centronics 50 pin connector: this is a shielded 50 pin Centronics type connector. This is used mainly for external devices.
- Dual in-line IDC connector: this is a shielded 50 pin dual in-line IDC connector. It is used mainly for internal devices, but may be used on external devices, but these are not usually shielded.
- Dual in-line IDC connector: this is a non-shielded 50 pin dual in-line IDC connector. It is used mostly internally, specifically hard drives.
There are two sides to a SCSI cable, Male and Female. If you don't know what the difference is between them, the only way I can think of explaining it is through sexual terms. The male connector has pins that stick out while the female connectors have sockets that accept the pins.
<- this is a 50 pin IDC connector, usually found internally.
<- this is a 25 pin connector, usually found externally.
1. Decide whether or not you really need SCSI. If you are just using your computer for surfing the Internet or Word Processing you most likely don't need SCSI. If you work on your computer a lot then SCSI is probably right for you.
2. Make sure you have an open slot within you computer:
- Take the case off of your computer. This is usually accomplished by removing several screws.
- Now look for your motherboard, I have provided a picture of mine:
- You now want to look for an open PCI slot (number 4 in the diagram) or an open ISA slot (number 5 in the diagram)
- If you have one than you can proceed on to the next step, if you don't have an open slot than installing SCSI is most likely going to be more trouble than it's worth
3. You are going to need to get a SCSI card, I recommend an Adaptec. You are also going to have to decide which card to buy. Make sure that you buy one that corresponds to your open slot(PCI or ISA). For a PCI SCSI card I would suggest getting the 2930u2
4. You must also decide what peripherals you are going to get for it, there are many choices in this part of the setup. I will give you a couple of my recommended manufacturers for each product.
- Hard Drives- Seagate
- CD-recordable- Plextor
- Tape Backup- HP Colorado Backup
- Zip, Jaz drives- Iomega
5. Install the peripherals, usually the device will come with some sort of instruction manual. They shouldn't be too hard to install, for instance a hard drive requires only that you put the drive in and screw in some screws.
6. Install the SCSI card:
- Remove the cover from your computer
- Locate the open slot that you found in step 2
- Find the corresponding slot bracket and remove it
- This is the part that is very hard to give help on, you must set the jumpers on the card to the correct locations. You can usually find this information in your manual.
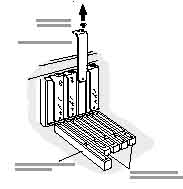
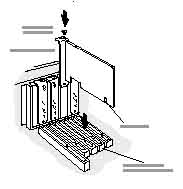
- Insert the card and screw into place
7. Attach the devices:
- First, make sure that all of your devices have a unique SCSI ID from 0 to 6. Information on how to do this can be found in your device's manual.
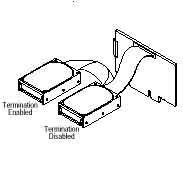
- Determine which one of your devices is going to be the last in the chain. Enable Termination on that device(again, this information can be found in your device's manual)
- Here is a possible setup:
- Plug in the devices by inserting one end of a SCSI cable into the card and the other into a device(make sure that the colored strip on the cable lines up with the pin 1 marker on the device). Then plug one end of another cable into that device and the other end into another device. This process continues until you reach the terminated device.
- Then locate the power cords inside of your case(they are usually colored). Plug one of these into each device that you have installed.
8. Install software(follow instructions that came with the card)